
Learning Aids: Images and Biofeedback
Target Training incorporates biofeedback techniques, visual stimuli, aural stimuli, verbal descriptions, and kinesthetic practice. The use of verbal and written descriptions of muscle interaction in conjunction with anatomical diagrams allows the students to know where and how to produce the targeted articulation. It is highly recommended that before teaching with this method, each teacher should have the facility to produce the targeted phonemes. The student often requires an aural example of the targeted phoneme. One could choose to use a recording to illustrate the targeted phoneme, but as we all know, it is much simpler to model the phoneme in question than to access it on a mechanical medium. With the advent of the personal computer, biofeedback techniques have become easily accessible. Real-time video images and spectrographic displays can be incorporated into Target Training. An example is to run, in real-time, a video image of an aspect of articulation in one window and VoceVista simultaneously in another. With this configuration, the student can view, in real-time, how articulatory changes directly affect vocal intensity and quality. The video image can present a frontal view of the open mouth or an ultrasound image of the tongue within the mouth.
Muscle Awareness
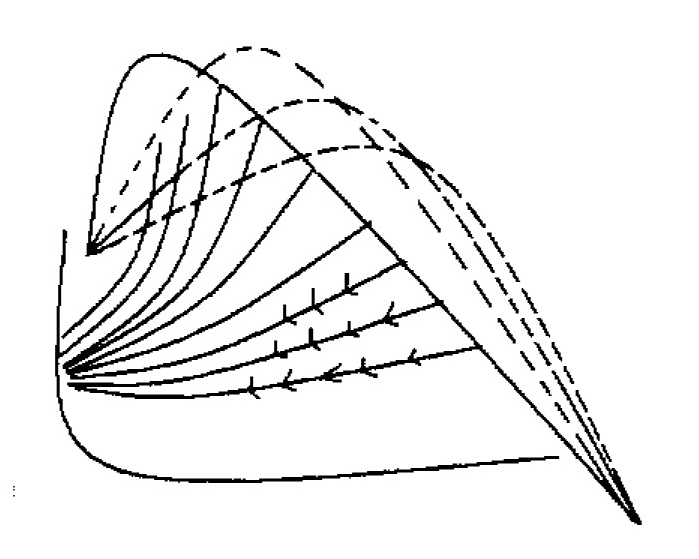
The genioglossus is a fan shaped muscle that is attached at the back inside portion of the lower jaw extending dorsally into the tongue (see figure 1 below). Awareness of the function of the genioglossus is achieved by having the pupil stick out the tongue. This must be performed by isolating the genioglossus so as not to produce tension in the other muscles. Show the student a diagram of the muscles of the tongue. Such diagrams can be found in many vocal pedagogy texts, online sources or speech and hearing science texts. The diagrams will make it clear as to where the tension should be felt. After the student has a concept of how and where it should feel, go to the next touch cue. With the tip of the tongue placed at the bottom gum line, pull the back of tongue forward using the middle and lower fibers of the genioglossus.
Figure 1. Forward movement of the tongue flexing the lower fibers of the genioglossus.
The front portion will fold over on itself causing the blade and dorsum to rise while the back becomes grooved and a portion of the blade of the tongue come in contact with the back of the bottom teeth. With practice, this can be performed without raising the larynx. Now place a tic tac or small piece of candy between the forward raised blade and the back of the top teeth. Allow students to find the position of least exertion and have them sing /i/. Practice this placement until the student can comfortably hold the tic tac in place.
Two touch cues can be used to elicit the grooving of the blade of the tongue. The first is to have the students place the first joint of their index finger on the bottom teeth. After placement, have the students place their tongue on the back of the bottom teeth. With the tongue relaxed, have the students bend their fingers. The place in which the finger and tongue come in contact is the recommended placement of the forward tongue grooving for back vowels. Give the students an oral cue of the Italian /a/. Have the students produce the forward /a/, while their finger exerts slight pressure against the tongue. This action, if performed correctly, can effectively turn on the recognition and production of this phoneme. Have the students practice a few times. It is important to instruct the students that this is only a way to find the targeted articulation. Further practice with pressure against the tongue will encourage a counter tension against the finger.
Another touch cue to aid the forward placement of the tongue groove is to give the students a ball-shaped lolly pop and have them suck on it. The blade of the tongue becomes grooved to rap itself around the candy. Have the students remove the lolly pop, recreate the groove, and sing a nice bright Italian /a/.
The tongue-based articulatory gestures for Target Training have been defined. It is important to remind the student that the muscle action originates in the genioglossus. The forward high tongue production uses the middle and lower fibers of the genioglossus.
Figure 2. Forward movement of the tongue using the upper fibers of the genioglossus.
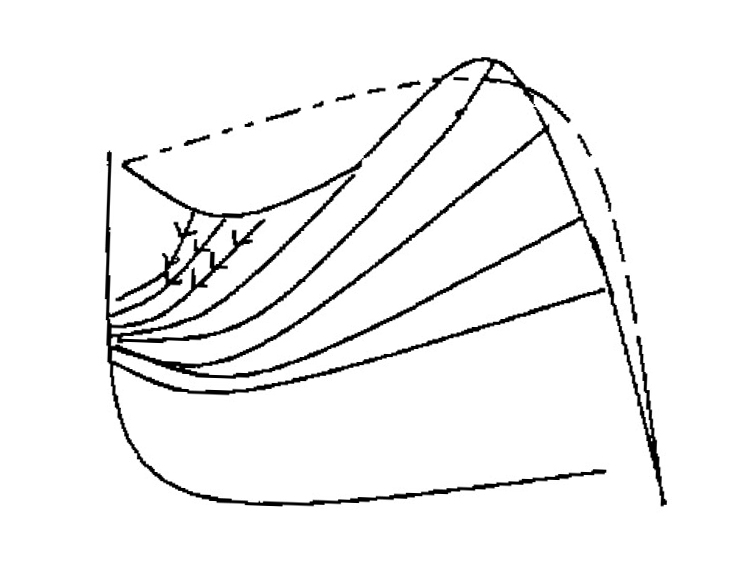
The forward lowered and grooved position of the tongue is produced by the upper fibers of the genioglossus (Figure 2). As the tongue comes forward the student should perceive the groove and how the underside of the tongue now comes in contact with the back of the bottom teeth.
The Acquisition Pitch
Before moving on to the actual acquisition of the vowel sounds, a comfortable acquisition pitch must be chosen. Akin to the optimal pitch,1 this pitch’s wavelength corresponds to the individual attributes of each student’s vocal tract. Some pedagogues suggest the affirmative “uh huh”. Most often, this reflexive response is a comfortable sound producing little vocal tract tension. This vocal utterance is most often produced in the middle of one’s vocal range. The preferred method for Target Training allows the students to perceive the pitch as more comfortable. Choose the interval of a perfect fifth in the middle of the students’ vocal range. Have the students hum the upper pitch. Ask them to notice how their larynx is being pulled up. This shortening of the vocal tract is to accommodate the wavelength to resonator. If the students do not feel the tension, choose a higher pitch. Now have the students hum the lower pitch, noticing how the larynx is pulled down, again conforming to the required needs of the wavelength. Have the student slide between the two pitches, gradually narrowing the interval until they notice no upward or downward movement of the larynx. Settle in on the one pitch that creates the least amount of physical exertion.
This pitch will serve as the acquisition pitch and is directly tuned to the length of the student’s vocal tract. As such, any influence the tongue’s motion exerts on the larynx can be noticed. Most often, this does correspond to the “uh huh” pitch, but the exercise allows the student to be aware of even the slightest tension or muscle contraction.
Vowel Acquisition
Now that the forward extremities (/i/ and /a/) of the student’s vowel scheme have been defined, it is time to start the acquisition of more efficient vowels. Begin by acquiring the center baseline of the student’s vowel scheme. The unaccented schwa (as mentioned previously) is the most neutral of vowels and is best created with the tongue in its most relaxed state. Most pedagogues ignore the schwa because it does not exist in the phonemic repertoire of Italian. Imperative for Target Training is a relaxed neutral baseline for comparison. The unaccented schwa best suits those parameters. For the unaccented schwa, a visual depiction is not needed. One could draw an idealized depiction as an example, if desired. An ideal way to find this articulatory position is to have the student relax and close their mouths. Have the students, through proprioceptive2 means, sense the shape the tongue has taken. At the relaxed position, the tongue will have its tip against the front teeth, the blade follows the contour of the hard palate, and the back will slope gently downward. If need be, model the phoneme for the student with either your voice or a recording.
After the baseline of the relaxed position is set, it is time to begin phonate in using the acquisition pitch. Have the students open their mouth slightly and sing the schwa vowel on the acquisition pitch. This should be done at a moderate dynamic level with little physical exertion. Remind the student that the production of the unaccented schwa should have little or no tension (If the tongue flexes, it’s wrong). If the student is incapable of keeping a consistent aperture a bite block can isolate the tongue’s movement from that of the jaw. Either the tic tac or the lolly pop could act as an impromptu bite block.
After achieving a relaxed production of the neutral vowel, one could turn to the various biofeedback techniques discussed earlier. With a real-time spectrograph, it is possible to fine-tune the placement. Fine-tuning would entail finding the articulation that produces a more efficient production or greater intensity and more harmonics with the same or less physical exertion. Care must be taken to adjust the position of the tongue to increase intensity rather than through an increase in air pressure. When both student and teacher are satisfied with the production it is time for the students to define it in terms that they can recreate. The definition can be in terms of visual, kinesthetic, or descriptive context. Visual definition can be won through the use of a mirror, camera, spectrograph, or FFT. Have the students construct a blank vowel quadrilateral. After the baseline has been set, have the students enter on the blank quadrilateral where they perceive the articulation of the schwa. The students’ perception may be different than that of the norms that are represented on the vowel quadrilateral. If you supply the student with a copy of the vowel quadrilateral, it is important that they be reminded, that it represents norms and that their most efficient production may not coincide with that norm. The baseline serves as the reference point for all the vowels. As Camarata pointed out, there are vowels that have no touch cues and as such, can be difficult to form in the three dimensional space of the vocal tract.3 Depicting the articulation in the space of the mouth will aid in its solidification.
Kinesthetic means would involve the student moving in and out of the desired position in successive approximation until muscle memory takes effect. Memorizing the articulation through repetition must be done. Acquired articulations must be practiced, to override the native impulses of speech. Use touch cues or descriptions of the shapes the tongue. If the students cannot articulate how it is produced, its reproduction is highly unlikely.
We are now ready to start articulation acquisition for front vowels. The vowel quadrilateral can be used to illustrate the direction of the articulatory gestures to be acquired and refined.
Figure 3. The Vowel Quadrilateral (Skarbø 2000)
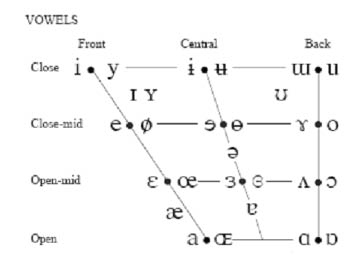
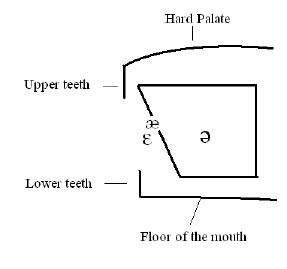
The Vowel Quadrilateral is representation of vowel articulatory positions. As such, it can illustrate the direction of articulatory gesture to be utilized within successive approximation. Remind the student that their specific physiognomy may alter the degree of articulatory gesture, but that the gesture is consistent with the depictions found on the quadrilateral. Provided as an example is the author’s articulatory position for /ε/ (Figure 4).
Figure 4. Depiction of the author’s articulatory placement of /ε/.
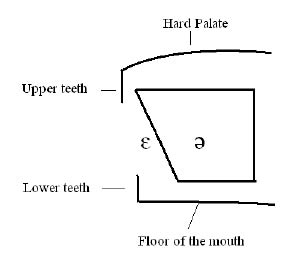
The gesture between the schwa and /ε/ is an anterior and superior movement of the blade of the tongue. The depiction on the quadrilateral (Figure 3, above) shows the /ε/ anterior and slightly inferior to the midline schwa. These slight discrepancies make it imperative to use successive approximation to move into the vowel articulation which is correct for the individual student.
The forward positioning of the tongue has proven itself to create the more efficient articulations. However, care must be given not to pull the larynx up. As the tongue articulates forward there is a need for less breath pressure. Have the students consciously check using the diaphragm. Checking will allow the larynx to remain low.
Singing the acquisition pitch with the schwa articulation, pull the tongue forward, flexing the mid portions of the genioglossus. Make certain that the tongue tip is touching the gum line of the bottom teeth. Allow the front of the tongue to bulge. Through this action, it will raise comfortably under the hard palate. The first vowel change will be to that of /ε/.
Have the student practice this successive approximation from the schwa to the /ε/. Use any of the biofeedback techniques available to solidify and improve the effectiveness of this articulation. Some students will notice how the back of their tongues becomes grooved as body of the tongue moves forward. This grooving of the back of the tongue allows the epiglottis to stand erect, producing the narrow laryngeal vestibule, which is so important to the aero-acoustic transmission of the air stream through the vocal tract. As in the case of the acquisition of the neutral schwa, have the student define the articulation and enter it onto the quadrilateral that will eventually depict their specific vowel scheme. The definition must be clear to the students through the use of a combination of learning modes. The most important aspect is that the definition will recall the articulation accurately.
Have the students practice the successive approximation again in conjunction with the biofeedback to solidify the articulation. The slight degree of movement necessary for the articulation change will most likely astonish the student. Confirm that the vowels are indeed correct. Be sure to illustrate that the overall quality of the voice does not change. This is where the real-time spectrograph can easily depict the steady intensity of the fundamental frequency and the comparative strength of the harmonics. Have the student produce the change with a varied articulation by adjusting the mouth’s aperture. This misalignment of resonator to wavelength will allow the student to sense the change in quality and intensity. If performed in conjunction with the spectrogram, the changes will be visible.
Repeat the above procedure starting with the /ε/. Continuing to use the acquisition pitch, sing the /ε/. Slightly flex the genioglossus, pulling the body of the tongue forward. As the tongue bulges higher under the hard palate, the vowel will change to /e/. Remember that slight checking should accompany the articulatory gesture. Practice the articulatory gesture using the biofeedback to solidify definition, articulation, and muscle memory, and enter into their personal vowel scheme.
Repeat the procedure articulating /e/ to /![]() /4 and /
/4 and /![]() / to /i/. As the tongue bulges higher, the student should feel how the tongue folds over on itself. The height of the tongue’s blade and dorsum is caused by the drawing forward of the body of the tongue toward the back of the chin. With each successive forward approximation, the groove in the back of the tongue should become more apparent.
/ to /i/. As the tongue bulges higher, the student should feel how the tongue folds over on itself. The height of the tongue’s blade and dorsum is caused by the drawing forward of the body of the tongue toward the back of the chin. With each successive forward approximation, the groove in the back of the tongue should become more apparent.
As the tongue folds over on itself, new touch cues are discovered. The more superior and anterior the tongue’s blade and dorsum becomes, the more the tongue comes in contact with the upper teeth to the side of the mouth. This touch cue is quoted consistently in the literature and should be clarified as the student perceives its occurrences. Each student has their own specific physiognomy, but the touch cue like the articulatory gestures are consistent. In the production of the forward efficient /e/, one should notice the lateral portions of the tongue’s blade contacting the top bicuspids. As the tongue’s blade and dorsum moves anteriorly and superiorly for the articulation of /i/, one should notice how the lateral portions of the tongue contact the upper cuspids. As stated earlier, after the efficient relaxed articulatory positions /e/, //, and /i/ are all acquired, have the students define them and enter them onto their personal vowel scheme.
To solidify the gestures, articulate the vowels in paired isolation and succession. Begin with paired isolation in the order of acquisition: the schwa to /ε/, / ε/ to /e/, /e/ to /e/, and finally /e/ to /i/. It is helpful to perform this task in conjunction with the real-time spectrograph and image of the forward movement the tongue. This dynamic monitoring allows the student to associate small articulatory gestures with the clear change in vowel-quality. After being certain that the vowels are solidified in isolation, practice them in succession with dynamic monitoring. Begin with the schwa and move to /ε/, to /e/, to /e/, and finally /i/. It is important to note that there are language specific articulations of /e/ of which the singer needs to be aware. In the above acquisition regime, the closed German /e/ is included to illustrate that the through knowledge of the articulatory position and gesture, any vowel articulation can be acquired.
If the student has difficulty performing the successive approximations, word pairs can be use to facilitate the process. The following word pairs deviate from the speech pathologist technique. Cut- kettle-Kate (omit diphthong)—Kehle (closed German)-key. Normally, between words, only the target phoneme should vary. Because one of the targeted phonemes is foreign, the words chosen all have the same initial phoneme, targeting the second phoneme as the variance. Have the student articulate the /k/ forward on the hard palate.
If need be, return to the “tic tac” technique, having the student articulate the /k/ while keeping the candy in place behind the top teeth. This may take some practice before it can be achieved without raising the larynx. This forward articulation of /k/ can be achieved with the flexing of the genioglossus, raising the tongue past the /i/ into contact with the hard palate between the cuspids. This forward positioning of the /k/ is a more efficient production than the back position. The higher pitch of the forward /k/ makes the consonant more perceptible than the back production. As in the case with the muscular effort to create the more efficient vowels, the genioglossus articulation requires less physical exertion than the styloglossus/palatoglossus articulation. In fact, to articulate against the lower anterior portion of the hard palate requires less effort than to articulate against the high back arch of the posterior portion of the hard palate. After the successful acquisition of the forward /k/ use the word pairs in isolation and succession as performed with the vowels. Consider using just the first two phonemes of the word pairs to isolate the targeted phoneme. If the /k/ is sufficiently forward, the vowels, through coarticulation, will be produced in the forward, more efficient position.
Before moving on to the back vowels, let us address the /I/ (in kit) and the /æ/ (in cat). The /I/ is placed on the quadrilateral (Figure 3) just above the /e/. The articulatory gesture for /e/ to /i/ was that of anterior and superior. To acquire the /I/, the gesture from the /e/ articulation is solely superior. Have the student practice this gesture and fill in the /I/ on their personal vowel scheme. The use of the real-time monitoring can solidify the perception of the minute difference in articulation between these two sounds.
The /æ/ in the word “cat” is found on the forward portion of the quadrilateral slightly below the horizontal midline of the schwa. This vowel illustrates the linguistic tendencies of American English, namely the lateral positioning of the lips during speech. If one was to merely change the position of the tongue to match its depiction on the quadrilateral, the result would be closer to /a/ than /æ/. By adding lateral movement of the lips to that gesture /æ/ is produced. The lateral movement of the lips shortens the vocal tract and greatly influences the most forward cavity. The Savariaux et al. (1995) study on /u/ confirmed the correlation of the lateral movement of the lips and the retraction of the tongue. The retraction of the tongue can have negative consequences on the alignment of the laryngeal vestibule and the overall path the air column takes.
How do we duplicate the characteristics of each of the cavities within the vocal tract to produce a more efficient /æ/? Both the retraction of the lips and the lowering of the blade of the tongue result in the lowered blade dorsum of the tongue laying anterior for /æ/ in comparison to the schwa. A different way to produce this effect is to bring the tongue forward. Without the lateral positioning of the lips, the /æ/ lies superior to the /ε/ on the quadrilateral. The articulatory gesture is like that of the /e/ to /I/, solely superior.
Figure 5. Non lateral production of /æ/.
 Have the student practice this articulatory gesture using dynamic monitoring. For this vowel, it is imperative that the face be visible to the student. Because the targeted articulation is varied enough from the native articulation, the student will need more than auditory stimulation.
Now produce the acquired front vowels in succession, beginning with the baseline schwa, then in reverse. The order is: schwa to /ε/ to /ε/ to /e/ to /I/ to /![]() / and finally to /i/. Again, dynamic monitoring with the spectrograph and imaging of the open mouth can aid in the permanent acquisition of the targeted articulations. If needed, use the forward /k/ coarticulation technique to keep the tongue forward (cut, ket, cat, kate, kit, kehle, key). Before moving on, check again that the students have entered the acquired articulation on their personal vowel scheme and can clearly define the articulation.
/ and finally to /i/. Again, dynamic monitoring with the spectrograph and imaging of the open mouth can aid in the permanent acquisition of the targeted articulations. If needed, use the forward /k/ coarticulation technique to keep the tongue forward (cut, ket, cat, kate, kit, kehle, key). Before moving on, check again that the students have entered the acquired articulation on their personal vowel scheme and can clearly define the articulation.
Let us move on to the acquisition of the back vowels. To successfully retain a forward tongue position for the back vowels, we will adopt an approach similar to Lehman’s.5 We will base all the back vowels on the grooving found in the blade of the tongue for /a/.
In order to achieve this we must first acquire an efficient production of /a/. The forward or Italian /a/ is richer in upper harmonics than its counterparts, the mid /![]() / or the back /
/ or the back /![]() /. The lolly pop touch cue should be repeated. This will reacquaint the student with the articulatory gesture of grooving the blade of the tongue. Remind the student that the grooving is created by flexing the superior fibers of the genioglossus. The student should remark how the tongue’s groove is created through, what Vanard referred to as the “self extension.”6 The students should feel how the inferior portion of the tongue is contacting the bottom teeth.
/. The lolly pop touch cue should be repeated. This will reacquaint the student with the articulatory gesture of grooving the blade of the tongue. Remind the student that the grooving is created by flexing the superior fibers of the genioglossus. The student should remark how the tongue’s groove is created through, what Vanard referred to as the “self extension.”6 The students should feel how the inferior portion of the tongue is contacting the bottom teeth.
As before, we will start with the baseline schwa. Continue using the acquisition pitch, encouraging a relaxed laryngeal position. Have the students sing the baseline schwa. While singing, have them create a slight groove in the blade of the tongue. As the blade of their tongue is pulled inferiorly and slightly anteriorly, have the students notice how the dorsum of tongue moves superiorly. It is important to stress that the tongue’s dorsum rises within the confines of the hard plate. This creates the grooving in the back of the tongue, allowing the epiglottis to stand erect and the air stream to avoid the pyriform sinuses, pharynx and portions of the soft palate. The superior movement in the dorsum of the tongue is similar to how the tongue’s blade becomes higher in the front for the front vowels. The movement is caused by muscle forces below the tongue’s surface. One must be certain that the superior movement is not produced by the contraction of the styloglossus and or the palatoglossus. If this were to occur, the quality of the voice would become thin.
The articulatory gesture of creating the forward groove is visible with an open mouth. As such, either the mirror or the video image on the computer monitor can be very helpful to the student. With the real-time spectrograph, the student can associate this slight movement to a change in vowel quality. As before, the student should practice the articulatory gesture in isolation and successive approximation until it can be performed with a stable laryngeal position. Have the students enter the vowel onto their personal vowel scheme and clearly define the articulatory position. Have the students reproduce the articulation to determine the effectiveness of their definition.
The back vowels are most often associated with a decrease in the cross-section of the aperture of the mouth or lip rounding. The interdependency of the lips and tongue will be used to advantage. The lips retract to insure that the forward cavity of the vocal tract corresponds to the resonances of the vowel to be produced. It is imperative to retain the position of the dorsum of the tongue achieved with the forward /a/. The tongue’s dorsum’s position, which is under the hard palate, was shown to propagate more efficient vowel productions.
Using the acquisition pitch, have the students produce the /a/. While looking at an image of their mouth, have them pucker slightly, bringing the corners of the mouth forward. The tension should be felt only in the obicularis oris, the circular muscle that surrounds the mouth. The lip rounding created by this muscle will draw the corners of the mouth forward. This action will lengthen the mouth cavity and lower the second formant, changing the /a/ to /![]() / as in “caught.” As before, checking should accompany this action. As the cross section decreases the end correction increases; to counteract that effect, the airflow needs to be shorted by expelling less air.
/ as in “caught.” As before, checking should accompany this action. As the cross section decreases the end correction increases; to counteract that effect, the airflow needs to be shorted by expelling less air.
Performed with the spectrograph, the change in vowel quality is made visible and can solidify the students’ perceptions. Continue to have the students make a record of the acquired articulation on their personal vowel scheme. Reproduce the targeted articulation in isolation and succession to codify the students’ perceptions.
As the case was with the forward vowels, one need only proceed with this pattern to successfully acquire the back vowels. Each of the vowel changes from /![]() / to /o/, to /
/ to /o/, to / ![]() /7 and finally to /u/, can be articulated with an increase in lip rounding and checking. It is important that the students continue to use the obicularis oris to accomplish the lip rounding. Some English speakers use a lateral movement of the corners of the mouth to decrease the cross-section of the mouth. This does not extend the end of the vocal tract and will cause the tongue to retract aligning the forward resonance cavity. The students should also notice a slight anterior movement of the tongue as the lip rounding is increased.
/7 and finally to /u/, can be articulated with an increase in lip rounding and checking. It is important that the students continue to use the obicularis oris to accomplish the lip rounding. Some English speakers use a lateral movement of the corners of the mouth to decrease the cross-section of the mouth. This does not extend the end of the vocal tract and will cause the tongue to retract aligning the forward resonance cavity. The students should also notice a slight anterior movement of the tongue as the lip rounding is increased.
As before, each of the articulations should be performed in isolation and succession, culminating in the production of one after another. The order is schwa to /a/, /![]() /, /o /, /
/, /o /, / ![]() /, /u/. As in the case of the front vowels, a non native English phoneme is included. The /o/ includes the diacritic mark that signifies more lip rounding. This foreign vowel lies directly between /o/ and /u/ and should be acquired. Hans-Heinrich Wängler (1967) states that the /o/, the German o, is most often produced too far open and with too little lip rounding.8
/, /u/. As in the case of the front vowels, a non native English phoneme is included. The /o/ includes the diacritic mark that signifies more lip rounding. This foreign vowel lies directly between /o/ and /u/ and should be acquired. Hans-Heinrich Wängler (1967) states that the /o/, the German o, is most often produced too far open and with too little lip rounding.8
With the aid of dynamic monitoring of the mouth and the harmonic spectra, the student can associate each articulatory gesture with the targeted vowel. If needed, use coarticulation with the following word pairs: Cut – Cot – Caught - Coat (omit diphthong) - Kosen (German o) – Coo. It will be difficult for the student to articulate the /k/ forward. It may be necessary to train the place of articulation against the hard palate. Relate to the student that by flexing the genioglossus, the back of the tongue rises. After the articulation of the /k/, the tongue relaxes into the desired vowel articulation. It is imperative that the body and back of the tongue remain slightly grooved to facilitate efficient resonance.
After the front and back vowels are mastered, turn the attention to the hybrids. The / ![]() /, /œ/, /Ø/, /Y/, and /y/, the fronted hybrids are merely the front vowels with a degree of lip rounding. These vowels are not native to many of the world’s languages. For that reason, it will be difficult for many students to hear the slight variances. With the outer aspects of the student vowel scheme recorded, it should not be difficult to explain the actual articulation. It is highly recommended that the real-time spectrograph be used in conjunction with the acquisition of these vowels. Its use is not to fix exact harmonics but to recognize the slight changes in vowel-quality.
/, /œ/, /Ø/, /Y/, and /y/, the fronted hybrids are merely the front vowels with a degree of lip rounding. These vowels are not native to many of the world’s languages. For that reason, it will be difficult for many students to hear the slight variances. With the outer aspects of the student vowel scheme recorded, it should not be difficult to explain the actual articulation. It is highly recommended that the real-time spectrograph be used in conjunction with the acquisition of these vowels. Its use is not to fix exact harmonics but to recognize the slight changes in vowel-quality.
Let us address the /y/ as an example of how to approach the acquisition of the hybrid vowels. By its placement on the quadrilateral, we know that the /y/ has a similar degree of tongue height and fronting as the /i/ and a similar lip rounding as the /u/. Through the use of Target Training, the student should have gained an independence of articulatory gestures. For example, the front vowels require only the tongue to change position to produce its neighbor on the quadrilateral. On the other hand, the back vowels require the bulk of the articulatory variance to be produced through lip rounding. By acquiring these two subsets of vowels9 separately, we have isolated articulatory function and thereby learned independent movement.
The student can use that independence to combine the necessary articulatory gestures to produce any given vowel that lies on the quadrilateral. In this case, the student can begin with the /i/ and increase lip rounding until the point at which a satisfactory /y/ is produced. The other possibility is to begin with the /u/ and increase tongue height and fronting until the /y/ is produced. It is best to use both methods separately and in conjunction with one and other, producing /i/ to /y/, /u/ to /y/, /i/ to /y/ to /u/, and finally /u/ to /y/ to /i/. In the final two patterns, the hybrid is solidified between two known and practiced articulations. As before, any newly acquired vowel should be entered into the student’s personal vowel scheme and defined.
The remaining forward hybrids, / ![]() /, /œ/, /Ø/, and /y/ can be acquired through the same process. With the acquisition of each, the student should define and record the articulation. Part of that definition should include key words that can help recall the articulation.
/, /œ/, /Ø/, and /y/ can be acquired through the same process. With the acquisition of each, the student should define and record the articulation. Part of that definition should include key words that can help recall the articulation.
The subsets of vowel articulation, back non lip rounded, central vowels, and central lip rounded vowels can all be acquired through the articulatory gestures already acquired. Remember, the quadrilateral infers the general direction of articulatory gesture. By using successive approximation, the student can in effect slide into the next vowel production. This allows the students to perceive the slight changes in vowel quality that occur across linguistic boundaries. As each new vowel is acquired, the student should enter their efficient production into the visual representation of their vowel scheme. As with many vowels, there are alternative ways to articulate them. One must remain diligent that the configuration of the tongue allows free airflow, does not raise the larynx, and has the tip of the tongue in contact with the back of the bottom teeth.
The French saying, un bon vin blanc (a good white wine) contains the nasal vowels needed for the French.10 Spelled in IPA, the sentence reads ![]() . When spoken in French the velum (soft palate) is lowered, cutting off most of the airflow through the mouth. In cultivated singing this is not the case. The French most often start the vowel with little nasalization, adding more to the final portion of the held utterance, a kind of nasal diphthong if you will. The acquisition of the nasal vowel is simple. By lowering the velum during the Articulation of the root vowel, one arrives at the desired phoneme. Here again are variations, the /
. When spoken in French the velum (soft palate) is lowered, cutting off most of the airflow through the mouth. In cultivated singing this is not the case. The French most often start the vowel with little nasalization, adding more to the final portion of the held utterance, a kind of nasal diphthong if you will. The acquisition of the nasal vowel is simple. By lowering the velum during the Articulation of the root vowel, one arrives at the desired phoneme. Here again are variations, the /![]() / is sometimes bases on the /i/ making it slightly brighter. Adams (1999, 137) points out that although the /
/ is sometimes bases on the /i/ making it slightly brighter. Adams (1999, 137) points out that although the /![]() / is base on the dark /
/ is base on the dark /![]() /, this nasal vowel should be sung brightly. He suggested that one should articulate it on the /a/. In fact brightening (tongue fronting) all of the nasal vowels will reduce the nasality, for a more pleasing tone.11 As before, this is a question of using successive approximation to fine tune the articulation. After the vowels are acquired they should be entered into the students’ vowel scheme, defined and reproduced.
/, this nasal vowel should be sung brightly. He suggested that one should articulate it on the /a/. In fact brightening (tongue fronting) all of the nasal vowels will reduce the nasality, for a more pleasing tone.11 As before, this is a question of using successive approximation to fine tune the articulation. After the vowels are acquired they should be entered into the students’ vowel scheme, defined and reproduced.
It normally takes but a half-hour lesson to introduce Target Training and acquire the front vowels. After the students have effectively practiced the acquired vowels, during the next lesson, the back vowels are introduced. In a one-hour period, the efficient production of eleven vowels is acquired. The teacher can choose to continue with the acquisition of the remaining vowels until all desired articulations are incorporated into the student phonemic repertoire or wait for acquisition at the time when the new phoneme is required.
The students should now have a keen understanding of vowel articulation and modification. At this point the student should test that knowledge by producing vowels on varying pitches. An excellent exercise is to use the acquisition pitch as the baseline and to slide into intervals above and below. Do point out to the students that with each pitch, vocal tract length must be changed; a combination of aperture and airflow can easily accomplish the alteration of the resonating length. As the students slide up in pitch slightly, it should be accompanied with a slight opening of the mouth and a slight degree of checking.
Vowel modification occurs, in some degree, every time one changes pitch while retaining a single vowel. The articulatory gesture from vowel to vowel remains the same for each of the many configurations the vocal tract can assume. It is important to realize that the scope of that gesture is what requires fine-tuning. Through Target Training, a method to conscientiously control both the degree and the gesture itself can be acquired.
Final Thoughts
Target Training increases the efficiency of vowel articulations, based on the clarification of articulatory gestures. Through ultrasound experiments that re-created targeted articulations, the incorporation of articulatory gestures were recognized as a viable means to improve the Target Training. This method fits nicely into the relatively new form of phonology known to as gestural phonology.12
This method gives both the pedagogue and student a structured process of building a more efficient vowel production and a sound vocal technique. Modern voice science yields modes codifying and clarifying the vocal traditions of the past. For over four hundred years, vocal pedagogues have told singers that, while singing a vowel, the tongue should remain in contact with the bottom teeth. Nonetheless, literally hundreds of depictions throughout vocal pedagogy and other related fields illustrate other articulatory positions. Using ultrasound and speech analysis technology in real-time dynamic monitoring, the study from which this approach is based validated the forward tongue placement. It is of great importance to emphasize that forward placement of the tongue should in no way interfere with a relaxed low laryngeal position.
The use of science to explain and acquire vocal technique is a welcome resource; ultimately however, it is the aesthetic judgment of teacher, student, and audience member that must regulate the development of the voice.
Bibliography
Adams, David. A Handbook of Diction for Singers: Italian, German, French. New York: Oxford University Press, 1999.
Camarata, Stephen. “Vowel Production in the Treatment of Phonological Disorders: A Case Study.” The Clinical Connection 7, no. 3 (1993): 8-9.
Kent, Raymond. The New Phonologies. San Diego: Singular, 1997
Lehmann, Lilli. How to Sing. 1902. Reprint, New York: Dover, 1993.
Luker, Calvin and Luker, Tricia. “A family Guide to Common Terminology Associated with Speech Therapy.” Retrieved June 24 2006 from http://www.bridg es4kids.org/ pdf/Luker/SpeechTherapy.pdf
Savariaux, Christophe, Pascal Perrier, and Jean Pierre Orliaguet. “Compensation Strategies for the Perturbation of the Rounded Vowel [u] Using a Lip Tube: A Study of the Control Space in Speech Production.” Journal of the Acoustical Society of America 98, no. 5 (1995): 2428-2442.
Skarbø, Kristian. (2000). A Sound Reference to the IPA. Retrieved August 15, 2009. http://wuchinese.com/ipa/THEINTERNATIONALPHONETICALPHA BET-vowels(revised to 1993).htm.
Vanard, William. Singing the Mechanism and the Technique. New York: Carl Fisher, 1967.
Wängler, Han Heinrich. Grundriss einer Phonetik des Deutchen, mit einer allgemein en Einführung in die Phonetik. Marburg: N.G. Elwert, 1967.
Endnotes
1Optimal pitch is a pitch that one may phonate most efficiently (Luker and Luker “A Family Guide”).
2A proprioceptor sensor detects the motion or position of the body or a limb by responding to stimuli arising within the organism.
4The diacritic mark found below the /e/ signifies the advancement of the root of the tongue.
7The diacritic mark found below the /o/ signifies extra lip rounding.
12Kent, Phonologies, 247. Gestural phonology asserts phonological representation is in terms of articulatory organization.